How to Restore a Dell Laptop to Factory Settings
Sometimes, restoring a laptop can be the only way to get it working properly again. It’s inevitable that installing different programs, managing different tasks and general usage can eventually leave older laptops feeling slow and sluggish to use. Although Dell laptops tend to be among the higher-performance models in their class, even they sometimes get slowed down or damaged by malware. You might also want to restore a second-hand laptop to factory settings to ensure there are no traces of the previous user left.
To restore Windows on your Dell and get it back in full working order, you may use a few different methods, but these all follow these basic steps.
1) Disconnect from the Internet
Ensure all Wi-Fi or ethernet connections are inactive on your laptop. This should prevent any unexpected problems or software updates from interfering with the process.
2) Choose how to go through the restore process

If you’re running Windows XP, Vista, 7 or 8, you should have a built-in program called Windows Easy Transfer. This allows you to select a local user and create an archive of all their files by following simple on-screen instructions. This program is not included on Windows 10.
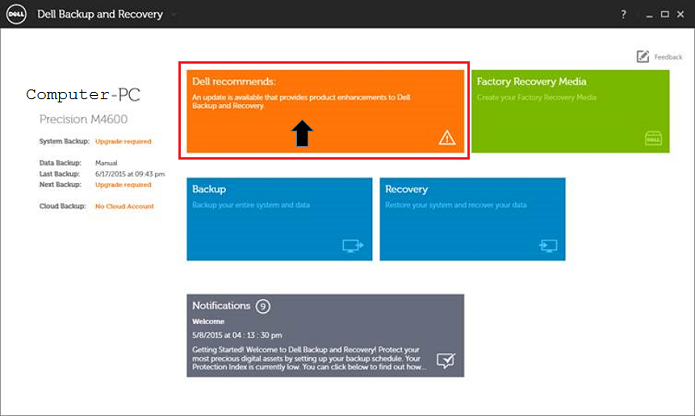
Alternatively, Dell offers its own tools to back up your files. Recent Dell models running Windows 7 or later may include Dell Backup and Recovery (Basic). This program gives you the choice of backing up your files before manually restoring Windows, or it can take you through the whole process. This may be the best option to ensure you don’t make any mistakes.
Older Dell models running Windows XP or later may have Dell DataSafe installed. You can use this as an alternative method to create a backup of your files by following the instructions when you run the program. Dell Factory Image Restore may also be available, meaning your laptop has a stored copy of what was originally installed when it was manufactured.
3) Create the backup of all files you want to keep
This is a vital step if you want your photos, music, documents and other files to be preserved when you reset your laptop using a manual process. If you don’t want to delete all your files, choose a method to back them up before you start. It’s best to use an external hard drive to do this so you can unplug it and keep it safe during the actual restoration process.
4) Password-protect your archive
If required, you can make your backup more secure by setting a password on the archive. This should be an option when you create the backup. This may be a good idea if you’re saving to a drive that other people have access to.
5) Start the reset process
If you’re using the manual method to restore your Dell laptop rather than guided process as outlined above, you can access the settings you need to initiate the process by restarting your laptop. As soon as it starts to turn back on, repeatedly press F8 on your keyboard to access the boot menu.
6) Select “Repair Your Computer”

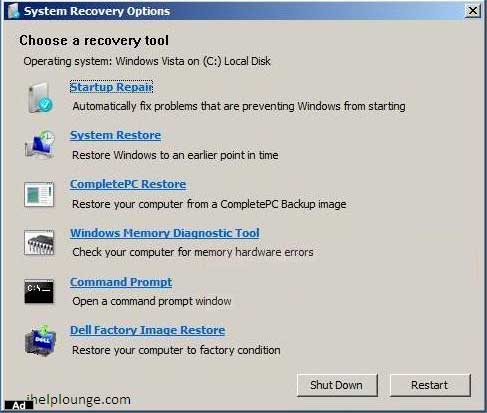
This is available when you see the black screen with white text beginning with “Choose advanced options” which should appear after you press F8 during startup. Use the arrow keys to select the first option, if it’s available. If you do not see “Repair Your Computer”, your laptop does not have a saved copy of the original operating system and you will need it on some form of external media to proceed (e.g. a CD with a copy of Windows on). You may be able to contact your seller or manufacturer to get this.
7) Choose your restore option

Again you should be presented with different options here depending on what software you have installed and what you used to back up your files. For example, if you used Dell Factory Image Restore, this will be an option now. If you used Windows Easy Transfer, this will not be an option until you continue with the process and start Windows again.
8) Follow all instructions
Carefully follow whatever instructions you are presented with, and make sure you understand what you’re going to do to your laptop before continuing! This will vary depending on your laptop model, any software you have installed and other factors.
9) Start up your new copy of Windows
When everything is ready to go, Windows will start as if your laptop is brand new. You’ll be prompted to enter details like your new chosen username, password, time and date settings. You will also need to accept the Windows terms and conditions.
10) Check your files are back
If you went through a guided process, for example using Dell software, your files may already be back in place automatically when you log in. If you used Windows Easy Transfer, you can use the program to open your archive in its saved location and extract your files. If you backed up manually you can simply drag and drop your files into your desired location.
11) Enjoy your restored laptop
Usually you will notice a speed increase when using and browsing your laptop if you restore after several years of use. The process should also fix a wide range of other issues including removing malware and adware.
If you’re currently in the market for a new laptop, we recommend taking a look at our range of refurbished Dell laptops, factory seconds and other types of discounted models. Unlike laptops that have gone through the process outlined above, the vast majority of our clearance computers have never actually been used and come directly from the manufacturer. Visit the ITC Sales Dell laptop store to see more.
